Pixelating images
- Published on
Recently, I have started tinkering around and building a game on the side, but quickly found I needed sprites. I thought pixel art would be great for this, but found doing this by hand can be rather time consuming and I tend to produce mixed results of quality. So, I figured I could try to write a small program that could assist me with creating pixel art. Ultimately, it would take an image as input and produce a pixelated image as output.
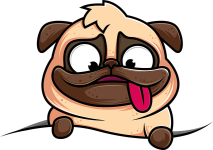
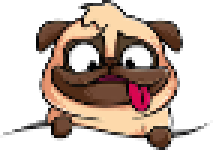
I managed to write a simple Golang program to reasonably accomplish this. Illustrated below is an example input and output.
I broke this down into a number of subproblems, which were new to me within Golang. After solving each subproblem, the combined steps resulted in an algorithm for converting an image to a pixelated representation.
The following highlights the subproblems and in combination the algorithm.
- Consume an image
- Build a data structure representing the image
- Use the data structure as input to produce a pixelated representation
- Save the pixelated representation to disk
Consume an image
To begin working with the input image, it simply required registering the
image format with image.RegisterFormat and invoking os.Open to read the
image from the file system.
image.RegisterFormat("png", "png", png.Decode, png.DecodeConfig)

file, err := os.Open(*in)
if err != nil {
  fmt.Fprintln(os.Stderr, "failed to open image")
  os.Exit(1)
}
defer file.Close()
Building the data structure
I settled on iterating across the input image and constructing a two-dimensional array of Pixel structs. The Pixel struct served as a RGBA color model representation. Upon completion, I had an in-memory representation of the image, which I could use for further processing.
type Pixel struct {
	R int
	G int
	B int
	A int
}
The following getPixels function receives a file (i.e. the input image) as
input, then iterates across the max width and max height and converts the
color at each pixel into a Pixel struct to build the two-dimensional array.
func rgbaToPixel(r uint32, g uint32, b uint32, a uint32) Pixel {
	var pixel Pixel

	pixel.R = int(r / 257)
	pixel.G = int(g / 257)
	pixel.B = int(b / 257)
	pixel.A = int(a / 257)

	return pixel
}

// https://stackoverflow.com/a/41185404
func getPixels(file io.Reader) ([][]Pixel, error) {
	img, _, err := image.Decode(file)
	if err != nil {
		return nil, err
	}

	bounds := img.Bounds()
	width, height := bounds.Max.X, bounds.Max.Y

	var pixels [][]Pixel
	for x := 0; x < width; x++ {
		var row []Pixel
		for y := 0; y < height; y++ {
			color := img.At(x, y)
			row = append(row, rgbaToPixel(color.RGBA()))
		}
		pixels = append(pixels, row)
	}

	return pixels, nil
}
Pixelating
To pixelate the data representation of the image, I effectively dissected the
image into square regions based on the provided blockSize. I represented
these regions in a separate two-dimensional array. Essentially, I collected
and averaged the pixels within each region to produce a color representation
for that region. Subsequently, I use the average pixels two-dimensional array
to build an image of the same size as the input image by filling each region
with the average color to provide a pixelated effect.
Listed below shows the pixelate function.
func pixelate(pixels [][]Pixel, blockSize int) [][]Pixel {
	width, height := len(pixels), len(pixels[0])
	result := pixels

	averages := make([][]Pixel, int(width/blockSize)+1)
	for i := range averages {
		averages[i] = make([]Pixel, int(height/blockSize)+1)
	}

	for x := 0; x < width; x++ {
		for y := 0; y < height; y++ {
			avgX := int(x / blockSize)
			avgY := int(y / blockSize)
			averages[avgX][avgY] = averagePixels(averages[avgX][avgY], pixels[x][y])
		}
	}

	for x := 0; x < width; x++ {
		for y := 0; y < height; y++ {
			result[x][y] = averages[int(x/blockSize)][int(y/blockSize)]
		}
	}

	return result
}
Save the pixelated representation
Lastly, I needed to turn the two-dimensional array representing the pixelated
image into an image file on the disk. This required constructing a blank
image, then iterating across the two-dimensional array and setting each pixel
with img.Set. To write the file to disk, I created a new file with
os.OpenFile and encode write the image to the file with png.Encode.
Listed below shows the entire implementation for outputImg.
func pixelToRGBA(pixel Pixel) color.RGBA {
	var rgba color.RGBA

	rgba.R = uint8(pixel.R)
	rgba.G = uint8(pixel.G)
	rgba.B = uint8(pixel.B)
	rgba.A = uint8(pixel.A)

	return rgba
}

func outputImg(pixels [][]Pixel) {
	width, height := len(pixels), len(pixels[0])

	img := image.NewRGBA64(image.Rect(0, 0, width, height))

	for x := 0; x < width; x++ {
		for y := 0; y < height; y++ {
			pixel := pixels[x][y]
			img.Set(x, y, pixelToRGBA(pixel))
		}
	}

	f, _ := os.OpenFile("out.png", os.O_WRONLY|os.O_CREATE, 0600)
	defer f.Close()

	png.Encode(f, img)
}
Try it out
I created a small implementation of this called pxl8, which provides a command line interface for pixelating images with a variable block size.
You can find pxl8 at: https://github.com/mattkubej/pxl8